Characterization of denture
Goals of complete denture therapy are-
- Function
- Speech
- ESTHETICS
- is observed that dental literature since 1973 revealed only 24 articles about dentate appearance of edentulous patients. More focus has been given on the esthetics of dentate patients.
Esthetics– the term is derived from the Greek word “Esthesia” which means sensibility or sensation. Esthetics is the adjective form of it meaning ‘Responsive to the beautiful in art or nature.’
Importance of Denture Esthetics
- Overall success rate
- was observed that when esthetic results are good the dentures were more successful.
2. Phonetics –
- to E. Pound phonetics is controlled by esthetics. But here he used the term for the proper form of the denture base.
DENTOGENIC CONCEPT
- Given by John Frush & Roland Fisher in 1955.
- Dentogenic means the art, practice, and techniques used to achieve the esthetic goal in dentistry.
- From a complete denture point of view, Dentogenic is “eminently suitable” for the wearer, the denture adds to the patient’s charm, character, dignity or beauty in fully expressive smile.
SPA factor
- According to this concept the SPA factor that is Sex, Personality, Age should take into consideration to avoid “Denture Look” in complete denture fabrication.
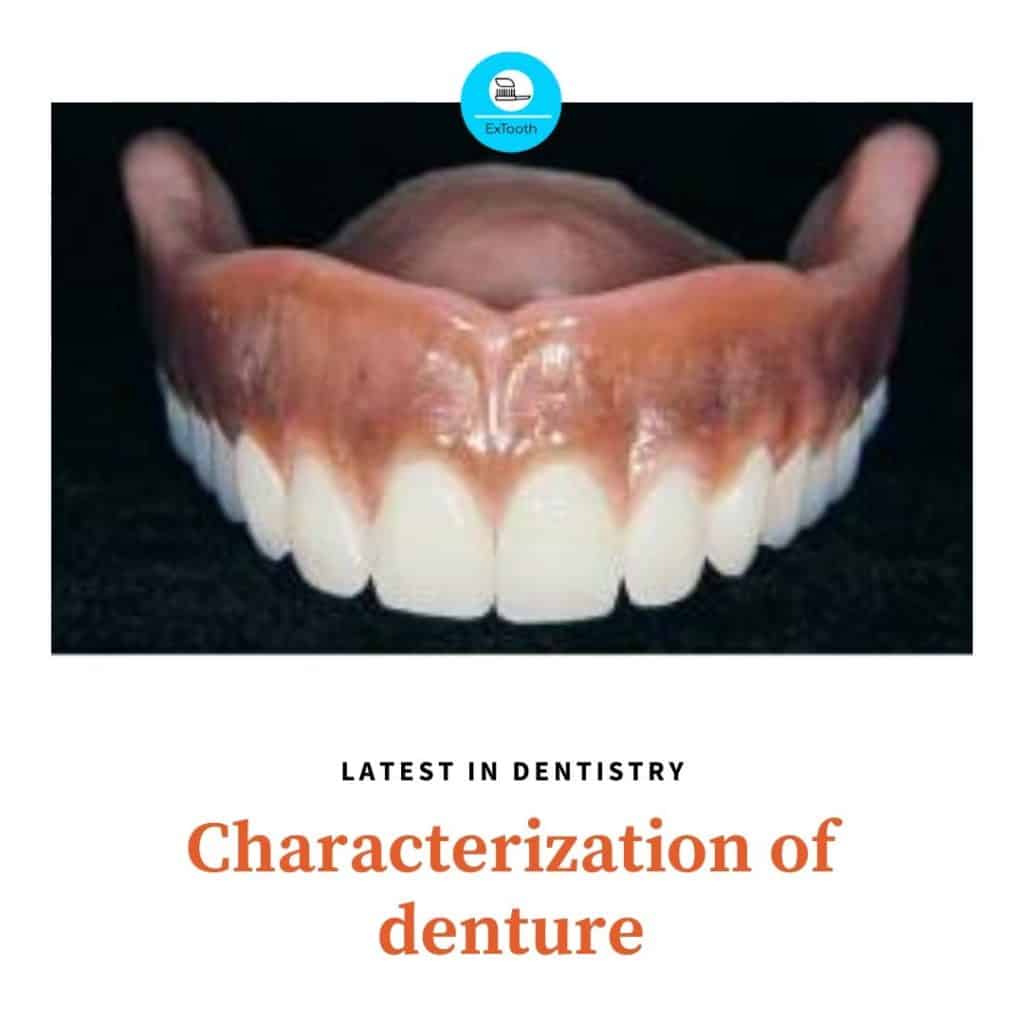
Characterization of denture
- Characterization means ‘Modification of the form & color of the denture base and the teeth to produce more lifelike appearance.’
- In simple words it means giving Individuality to the Denture.
- Routinely dentures delivered to the patient by dentist are well finished and polished but thy give ‘denture look’ or ‘false teeth look’ to the patient.
- Prosthodontist, we should restore patient’ ‘natural look’ and should not provide dentures with ‘artificial look’.
Characterization of denture
be introduced in complete denture by-
CHARACTERIZATION OF DENTURE TEETH
- Teeth Positioning
- Teeth Color
- Teeth Restorations
- Teeth Wear
CHARACTERIZATION OF DENTURE BASE
- An Esthetic Wax Up
- Staining of the denture bases
CHARACTERIZATION OF DENTURE TEETH
1) Teeth Positioning
- By prominent positioning of one of the anterior tooth as it was before in patients’ natural dentition.
- By giving ‘Natural irregularity of tooth positioning’ that is proper angulations and rotations of teeth.
- By maintaining Diastema as in natural dentition.
2) Characterization by Restorations
– Restoring some of the teeth will give a natural look.
3) Characterization by Tooth Wear
– With the advancing age natural teeth will show some Changes as attrition, abrasion, erosion.
– Incorporation of these changes in denture teeth will provide Natural look.
CHARACTERIZATION OF DENTURE BASE
Esthetic denture bases are particularly indicated for patients with-
- An active upper lip
- Prominent premaxillary process
- Theatrical performers, singers etc.
Elements to Be Considered for Characterization of denture-
1) An Esthetic Wax Up
2) Staining of the denture bases
1) WAX UP OF DENTURE BASE
Structures that should be included in waxing the denture bases are-
- Freni
- Free gingival margin
- Stippling
- Interdental papillae
- Root prominences
In maxillary denture bases, we should include-
-Palatine Rugae
-Incisive papillae
a) Interdental Papillae
– Routine interdental papillae design not only produces mechanical ‘Denture Look’ but also creates crevices & pockets that will lead to food Impaction, plaque accumulation, and bacterial growth.
– In youth, the papillae are pointed tight against teeth; while with advancing age they can be shortened.
– Similarly, papillae can be stained red to simulate the gingival irritation in advancing age.
– Massler said that “In old age, the attached gingivae lose their stippled appearance & appear edematous & smooth.”
b) Root Prominences (Festooning)
– Only the cuspid eminences are prominent & others are not much obvious.
– While Festooning, we should take care that the bulge is not formed at the borders. The root prominences should merge with the borders.
c) Stippling
– The surface of the natural attached gingiva appears rough when it is wiped dry.
– The stippling is limited to the attached gingiva.
– In the denture, stippling can be produced with the help of a stiff-bristled toothbrush, which is modified to have only a central row of bristles.
d) Free marginal gingiva & Gingival sulcus
– The production of a free gingival margin as in the natural dentition gives better esthetic results.
– Gingival sulcus can be produced by inserting No. 23 explorer tip between the teeth and the gingival margin.
e) Freni
– Labial, as well as buccal freni, can be produced in the denture to give a more natural appearance.
f) Palatine Rugae
Production of palatine rugae is very much important from comfort as well as phonetic point of view.
Technique
– A double thickness of 0.003 gauge tin foil is placed over the rugae area on the cast & swaged with a pencil eraser to obtain adaptation over the cast.
– The pattern is removed & cut around the edge to separate the 2 foils.
– Outer foil is discarded as it may have imperfections due to direct contact with a pencil eraser.
– The inner foil is trimmed accurately & and it is kept aside until wax-up is carried out.
– The corresponding area of the base plate is cut away.
– The base plate with the teeth set up is waxed up to the cast when it is still on the articulator to avoid errors in the occlusion.
– After buccal and palatal wax is done, the thickness of the wax is reduced in the palatal region from where the baseplate is trimmed.
– Now the tin foil pattern that was made earlier is placed in that position accurately & its edges are sealed with the wax spatula.
- Palatine rugae can be reproduced by direct wax-up during palatal waxing.
STAINING THE DENTURE BASE
– Several methods have been used to tint the denture base that will produce a natural appearance.
– Skillful tinting procedures can produce excellent results, BUT it is equally true that poorly executed tinting can give garish results that are worse than no tinting at all.
STAINING METHODS OF DENTURE BASE CAN BE DIVIDED AS-
1. Based on the time of Staining:
– Before the denture processing
– After the denture processing
2. Based on the Patients:
– Patients with deeply pigmented oral tissue
– Patient with lightly pigmented oral tissue
In 1951 Pound described ‘Sift In’ technique for denture base staining.
In this method Pound applied stains on the stone investment surface after flasking & dewaxing is done but before any packing is carried out.
For staining he used a kit- ‘Replident’ having 8 dispenser bottles of different colored polymers.
Lighter shades are usually used in the first application followed by other colors and blends where needed.
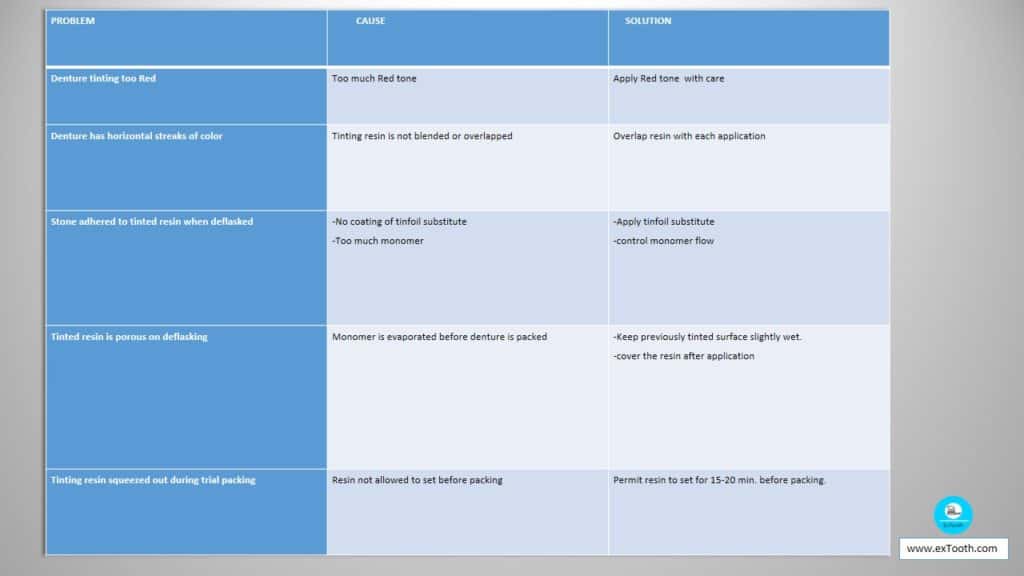
Problems:
- It is impossible to predict the results or to correct errors of application.
- The repeated addition of monomer directly against the separating
- may lead to adhesion of the acrylic resin when denture is deflasked.
-The procedures of carving and veneering colors on denture by hand is very much time consuming and requires additional skills.
– Pound made an attempt to simplify these procedures.
He with the help of his technician a technique was developed whereby the natural contours &colors could be fabricated by machine into a flexible acrylic veneer which can easily be adapted on denture surfaces during the packing operation.
Their application will require no additional time or skills.
There are 2 methods for denture base tinting with heat cure resins.
These methods are based on the ‘Sift in’ technique described by Pound (1951).
Technique
– Stains used in the technique are
H: basic color (light pink as in attached gingiva)
F: light red
A: medium red
E: purple
B: brown
– After flasking and dewaxing, paint it with the tinfoil substitute and allow it to dry.
– Sift H resin over the facial aspect of the flasking stone in the region of attached gingiva & saturate it with heat cure monomer.
– Sift a light coat of F over the H and extend F higher on the flange.
– Sift E sparingly at the muco-gingival junction.
– Sift A higher on the flange to the borders. Use it with care as it is red.
– In this way do one side first and by taking it into consideration do the another side.
– Place a plastic sheet over the tinted flask & allow it to set for about 15-20 min. before the denture base.
If pacing is carried out too soon, the tinting resin may be squeezed out of the mould or the distribution may get modified.
– Cure the denture, finish it and polish it in usual manner.
The second method described by Rudd, Marrow & Putten involves use of brown & purple stains for those with pigmented oral tissue.
– Sift F resin over the necks of the teeth but in a very thin layer. Saturate it with monomer.
– Screen a sheet of brown resin covering the F resin.
– Place red fibers above the muco-gingival junction on attached mucosal region & sift A resin over the fibers.
– Add E resin to the mucosal area to create mottled or scattered pattern.
– A slight yellow shade can be used as a highlighter over root prominences.
PROBLEMS WITH DENTURE BASE TINTING
Donald Kemnitzer described staining method is reverse of the technique described by Pound.
– Pound applied stains on the stone investment surface before any packing is carried out.
So all stains must be applied in reverse order, the one representing the outer surface being applied first.
– In this technique packing is done with natural shade acrylic resin but the plastic or cellophane trial pack sheets are placed between teeth and the acrylic resin being packed and not between the cast and the resin.
– So the final trial pack separation finds the acrylic resin adapted to the cast.
– Then stains are applied.
The technique is formulated around the 3 basic colors.
The armamentarium-
-Set of 5 bottles of stain
-Red stain: Kay See #279
-Yellow stain: Kay See #212
-2 bottles for blending and vascularity.
It consists of neutral pink polymer. Long red Nylon fibers are added sparsely in one bottle & in large amount in other.
– Blue, brown or a suitable combination of the two used for patients with melanotic pigmentation.
TECHNIQUE
A definite sequence is followed for each stain application – monomer-polymer-monomer.
- Yellow (pale) tones: applied over root prominences, rugae and hard palate.
- Red (deep) tones: applied over freni, incisive papillae, soft palate, and mucobuccal fold.
- Neutral (pink) tones: between root eminences, on lingual side of the lateral alveolar processes.
After application of yellow & red tones to the specific areas finally the neutral polymer stains are used.
– Neutral polymer having few fibers is applied liberally over all areas stained yellow or not stained at all.
– Neutral polymer having many fibers is applied liberally over areas stained red.
It serves 2 purposes:
a) obliterates sharp lines of demarcation of individual stains.
b) the nylon fibers will appear as blood vessels, denser in the areas where more fibers are added.
BRUSH-ON TECHNIQUE
In natural Coloring Of Cured Cross-Linked Acrylic: John L. Powers- JPD 1952; 3(3):351-354
-John L. Powers put forward this technique (1952)
-In this natural coloring is carried on processed denture.
-Natur-Tint is the material used.
It is supplied in 4 solutions.
- Solution 1 – A clear liquid used to prepare the surface of the denture base
- Solution2 & 3- Carry varying amounts of pigments for use on dentures of Caucasian patients.
- Solution 4 – Pigmented solution for dentures of Negro patients.
TECHNIQUE
-When a new denture is recovered from the flask, it should be shaped and cleaned but not polished. If an old denture is to be tinted, the high polish is removed with pumice and rubber wheels.
– Paint the solution 1 on the outer surface. Allow it to soak into the denture for about 3 mins.
– Determine the pigmented solution to use by comparing the color guide with them. The location and amount of pigment are determined by location and coloring in natural gum tissue.
– Two coats of Natur-tint are applied and allowed to dry for 10 mins.
– Blend the colors by brushing them with wet flour of pumice.
– Clean and dry denture & apply 2 coats of solution no.1. This solution will cover the pigmented coating with a protective layer of material.
– Remove the glaze which has formed when the solution is dried. The denture will look more natural if it is not highly polished.
ADVANTAGES
1) Simple method
2) It will neither wear off by the patient’s brushing off the denture nor will it be dissolved by chemicals that may go into the mouth.
3) It can be used in conjugation with the heat polymerized coloring techniques.
4) Can be used effectively on anterior fixed bridges & partial dentures where a labial veneer is necessary to restore the lip line or lost tissue.
CHARACTERIZING DENTURE BASE FOR NON-CAUCASIAN PATIENTS
Suresh Choudhary, James Craig, and Fredrick-JPD 1975; 33(1):71-75.
– Members of the Negro & other dark complexioned races have pigmentation of gingiva. The basic shades of gingiva should be duplicated in dentures for them.
– Dummett called attention of dental profession toward characterizing denture bases for black patients.
– In the described technique a product called Natural Coe-Lor is used. (It comes in 3 basic shades: Heavy, Moderate, Mild)
TECHNIQUE
Office Procedures
– Take close-up photographs of the area to be characterized.
– Note the pigments of the gingiva for the location and placement of the pigmentation material. This should be indicated on the preliminary cast.
– Write the work authorization & send the appropriate casts, waxed dentures, color prints to the lab technician.
Laboratory Procedures
– Complete the wax pattern, festooning, stippling to simulate natural dentition.
– Dewaxing is carried out & apply tin foil substitute.
-With a paintbrush, add blanching type acrylic resin powder around the necks of the teeth.
– Sprinkle the denture base acrylic resin on top of it . This will avoid displacement of during trial packing.
– Pick up the appropriate stain and place it in the designated location.
– Use a small amount of polymer powder incorporated in the monomer and applies it over the stained area.
– Set aside the flask & allow the monomer to evaporate.
– Pack rest of the flask with the appropriate basic color of acrylic resin.
– Process denture in usual manner & finish it & polish it.
The characterized areas should receive a minimum amount of polishing.
Gingival shade guides
- Gingival shade guides are available for the purpose of selection of proper shades.
1) Lucitone 199 – 4 shades
2) Ivocap plus gingiva indicator set – 4 shades.
2) IPS Gingival shade guide – 10 shades.
• IPS Gingiva shade guide provides higher potential for more accurate visual shade matching.
REVIEW OF LITERATURE:
- Earl Pound – Esthetic Dentures & Their Phonetic Values . JPD 1951; 1 (1):98-111
Earl Pound in 1952 described the importance of esthetic dentures in phonetics.
He stated that phonetics is 100% controlled by esthetics. Here he used ‘Esthetics’ in sense of accurate reproduction of supporting structures that are denture base.
He described 3 phases which should be considered for developing ‘New Look’-
– Natural setting of teeth
– Proper denture form
– Reproduction of natural colors of living tissue.
- Donald F. Kemnitzer- Esthetics & the Denture Base – JPD Sept.1956; 6(5): 603-615
Donald F. Kemnitzer (1956) – He described esthetic wax up procedures as well as. Staining method.
His staining technique for Characterization of denture is reverse of that of the Pound’s technique.
- John Powers-Brush on Technique of Cured Cross-Linked Denture Materials
JPD 1952; 3(3):351-354
He described the Characterization of denture for denture base tinting after the denture processing is done.
- JOHN FRUSH & ROLAND FISCHER-INTRODUCTION TO DENTOGENIC RESTORATION: JPD 1955; 5(5): 586-594
‘Dentogenic concept’ put forward by John Frush & Roland Fischer (1955).
Dentogenic means the art, practice & technique used to achieve the esthetic goals in dentistry.
They considered Sex, Personality, Age in their concept. (SPA concept).
These factors should be taken into consideration during denture construction to avoid “Denture Look”.
- Suresh Choudhary, James Craig & Fredrick Characterizing denture for non Caucasian patients. JPD, 1975; 33(1); 73-78.
– They described a method for staining denture base in patients with highly pigmented oral tissue.
– They used Natural Coe-Lor to stain the Characterization of denture.
- Jerome c. strain -Coloring materials for denture base resins- suitability for use. JPD JAN-1967; 17(1):54-59.
Jerome Strain (1961) in his study assembled 31 coloring agents to determine their suitability in coloring denture base. Consideration was given to their toxicity, color, stability, coloring properties & miscibility with the methyl methacrylate resin.
He finally selected 7 coloring materials for denture tinting.
a) Chromium oxide-green
b) Cosmetic red oxide
c) D & C red No. 35
d) Naphthol red L toner
e) Hansa yellow 10 G toner, pigment yellow no.3
f) Heliogen blue K toner
g) Monterey red
He also did microscopic examination after these materials were added to methyl methacrylate & observed that there is no reaction in the subcutaneous tissue.
REFERENCES
• Zarb GA, Bolender CL, Prosthodontic treatment for edentulous patients. 12th edition, Mosby publications, 2004, 303-307.
• Heartwell, Arthur Rahn-Syllabus of complete denture;
4th edition, Verghese publications, 1992, 343-351.
• Rudd, Murrow- Dental Laboratory Procedures – 2nd edition, Mosby publications; 545-550.
• Earl Pound-Esthetic dentures & their phonetic values, JPD 1951; 1 (1): 98-111.
• John Power, Brush on technique in natural coloring of cured cross linked plastic artificial denture materials. JPD, 1952; 3(3): 351-354.
• Hobert Procter, Characterization of Dentures. JPD, 1953; 3 (3): 339-349.
• Donald Kemnitzer, esthetics & the denture base, JPD Sept.1956; 6 (5):603-615.
• Choudhary S., James Craig, Frederic -Characterizing the denture bases for non Caucasian patients. JPD, Jan 1975; 33 (1); 71-75.
• Jerome Strain, Coloring materials for denture base resins, JPD; 1961; 17(1): 54-59.
• Frush J., Fischer R., Introduction to dentogenic restorations, JPD; 955, 5 (5): 586-594.
• Frush J., Fischer R., The age factor in dentogenics, JPD 1956; 7 (1):5-12.
• Michael Waliszewski, Restoring dentate appearance: A literature review for modern complete denture esthetics.
• Robert L.Engeleier, Complete denture Esthetics, Dental Council of North America, 71-84.
frolep rotrem
26 Jan 2021Superb blog! Do you have any tips for aspiring writers? I’m planning to start my own site soon but I’m a little lost on everything. Would you advise starting with a free platform like WordPress or go for a paid option? There are so many options out there that I’m completely confused .. Any recommendations? Thanks!